Proposed way to find a bike, that really fits biomechanically and/or makes one really physically comfortable for them, around Seattle, on a $$ budget, likely from some stranger (myself) who's not an expert at all, didn't do that much research, and expects you, yes you, to read the whoooole thing.
Then again, it doesn't seem like others that write on this subject are in accordance or have gotten to any definitive theory on the parts that matter and effect the other parts. One of my motives to write this is the bike shack has a metric f-ton of frames rusting under tarps with parts stripped off them, that would be nice to see be sexy. And it's lame to go through the outlying time and money of building a bike up from the frame without 3rd world labor/shop experience to find it's not going to work for the rider.
Bicycles can be comfortable for almost anyone, ages 5 to 90 or more, and a quarter inch of adjustment can be like going from a 60 lb bike to a 10 lb bike, or like making a 60 mile ride feel like a 10 mile ride, or from like arthritis to X-Men Wolverine quality.
STEP 1: Go to a bike shop that doesn't mind long enough test rides, with some ID or collateral, and sells bikes less than 5 years old that have removable or flipping faceplate handlebar clamp stems, and a decent selection of compatible stems (adjustable extension angle ones may be good for this) and seatposts. Do some test rides.
Without the intent of buying anything, one can get a fair amount of experience with how a certain shape of bike effects them by some test rides. This is the only real indicator of knowing if a bike fits or not for one's certain body and the way they like to ride no matter what a shop employee, physical therapist, or fitter says, especially when the biomechanical efficiency of any racing isn't the top priority. Those who call themselves professionals in this field constantly rely on the rider's feedback from much trial and error. Someone 5'10" could be fine with what's sold as a "52cm" frame, or a "60cm" frame with the top tube way over their perineum when it's off the saddle.
When test riding bikes, the thickness and softness of the bottom of the shoe matters. Where force presses from the shoe to the pedal also matters. Going from normal shoes to those that are designed to be used with a clipless system can be the difference in a framesize. If one isn't going clipless, the thickness of the sole at the ball and heel of the shoe, and the slope between these thicknesses matters.
Even if the bike feels great after a couple minutes, it's recommended the rider does the test ride like how they would commonly ride it if they owned it. This is if they can keep it called "new" by the shop in the process. If the riding is for a rural long gravel road, find a park with gravel for the test ride, if the riding is for a route with a certain total elevation gain and loss, stopping intervals, and distance, plan a route like this by the shop. Some folks in bike sales are fine with strangers test riding up to 4 hours with ID, and I haven't checked the current preferences of every employee responsible at the, literally, over 40 bike shops in Seattle proper alone, that sells bikes.
If anything is uncomfortable or akward when a rider tests a bike, they should the shop know of the effect more than the suspected cause. Don't just think that effect comes with all bikes or it must be X. Not that all of them should be trusted (including myself, if the shack is a shop), but the shop can help, or should at least be reminded of these things.
In a nutshell, the following are some common irks and causes of rider discomfort that have been made like a hypothesis from these references,
Complete Medical Guide for Cyclists, Andy Pruitt
Bicycling and Pain, Understanding Your Gears, and A Comfortable Saddle by Sheldon Brown
How to Fit a Bicycle by Peter White
and bikefitting.com (sciency!)
yes, they contradict themselves
The following is all not really organized by how one rides, as well as unusual body characteristics, which make all the difference. Fit is a compromise. 2 of many, many examples of riding style effecting fit:
Gary Klein: "...a person buying their first bike who begins to ride seriously will find that his/her body changes as they put in miles. With increased miles a rider will likely increase leg, arm, and back strength while becoming more flexible in the hips. As they gain fitness, the bike that used to fit comfortably with a 120 stem may need a 130 and more saddle setback to accommodate the fit rider’s new body and the increased pedal power they produce."
Sheldon Brown:
"A cyclist who is out of cycling shape from being off a bicycle for a few months or more, will start out strong, but the legs will tire rapidly. When the legs tire, the rider sits harder on the saddle, and that's when the trouble starts. Many saddle complaints are actually traceable to fatigue caused by starting out the season with a longer ride than you are ready for.
If you are coming off of a layoff of months or years, start with very short rides, maybe a mile or two, no more. Only gradually should you increase your ride distance. This may seem frustrating, but it does take a while to re-accustom your derrière to cycling. Anybody in decent shape can hop on a bike and ride 15-20 miles, but you'll be a wreck afterwards if you haven't accustomed your body to cycling first."
But, I've never heard of saddle complaints from those with laid back part leather Dutch bikes, and these folks may be called "serious" or "in cycling shape" with how they prefer to ride.
Not to obfusicate things, or to suggest all of the following will happen and be an issue, it's simply an emphasis in good test rides, taking one's time, having 5mm or 6mm allen wrenches at hand, and a variety of compatible stems and other parts available.
NECK
reach too short, reach too long, reach too high, reach too low, saddle too high, saddle too low
handlebar rotation, lever position, helmet loose,
saddle too far forward to cranks
BACK
reach too short, reach too long, reach too high, reach too low, saddle too high, saddle too low, saddle too far forward to cranks, not nearly enough suspension and flex in seatpost/frame/tires/saddle/fork, leg length inequality related causes such as not right shims, especially if clipless
SHOULDERS
hands resting on bars too far apart
WRISTS
saddle front tilted too far down
HANDS
levers positioned and/or bars rotated in such a way to make wrists bend too much, saddle front tilted too far down, no ergonomic grips, too much weight on same position for too long, too much padding, padding too soft/hard
GENITALS/PERINEUM
saddle too soft/hard, saddle shape, saddle too narrow, saddle front tilted too far up, saddle too far back, saddle too high (w/ foot-pedal retention), saddle too low, too much weight on same position/one riding position and posture for too long
THIGHS
saddle too wide, q-angle (horizontal distance from pedal to pedal) too narrow
KNEES
first three common; saddle too low, too many gear-inches (chainring teeth/sprocket teeth X whole wheel diameter in inches), too much too soon, patella abnormal alignment if clipless w/ iliotibial band pain, q-angle too narrow, clipless cleat positioning (usually too toed-in), saddle too high, very low float angle if clipless, bowlegs, "flat feet", "knock knees", a lot of tibial rotation
Pes Anserine Bursitis/Tendinitis: riding fixed (if clipless?), saddle too high, q-angle too wide
Biceps Femoris Tendinitis/Popliteus Tendinitis: saddle too high, riding fixed, bowlegs
ACHILLES
saddle too high, too much too soon, esp if saddle is too low (with clipless?), cleats too far forward, toe clips too short
ANKLES
bent crank
FEET
metatarsalgia: shoes too tight/hard/small, no orthotics, pedals too small
Folks at a bike shop may or may not mind this practice, and it would be nice to know that and make the intentions clear. On one hand, it would really help with anyone's interest in riding a bike, and when one is with the culture, they'll work with the culture more in the future. The shop employees may even help the bike looker get accurate reference information on the bike so they can make comparisons with bikes from another market on the same terms. On the other hand, in a certain place at a certain time, it could really not be worth the shop's time going through their brain getting picked, 16 hours of test riding, 4 stem changes, and a seatpost change at no cost to the test rider.
A payment for a stem or seatpost change, or additional time in aiding the bike search, may be totally worth it. On used bikes at the shop, some staff would repeatedly make handlebar, cable, and housing changes as well. Some shops really don't mind a multiple bolt handlebar-clamp stem change, headset spacer rearranging, pedal, or seatpost change for free if the brake and shifter housing makes that possible. If the brake or shifter housing doesn't permit the use of a longer stem, there's likely another bike in the stable or at another shop in town (literally over 40 shops in Seattle proper alone) that can do the trick.
When a quill stem is adjusted, especially one that's not the test rider's, the expanding quill probably shouldn't exert force on the threaded part of the steering column of the fork, and the minimum insertion/max height line on the stem should be, at the very least, below the top of the fork steerer tube, usually about 5mm below the top of the headset locknut. If the inside surface of the steerer tube tapers to a smaller circumference towards the front wheel, common on older bikes, recognize where this taper starts. Barnett's bike manual recommends using a 22.0mm BMX seatpost as a gauge for this. I just start with the stem wedge in a spot that's not along the tapered part at all, tighten the wedge until it really doesn't want to rotate in the fork with just two fingers doing the turning if the threads, the bolt head, washer, and the platform taking the washer's force, are clean with unsticky grease, and no hardened threadlocker, then I back off the expander bolt by 1/16th turn increments until I can shimmy and push the stem down. When the stem doesn't want to move down anymore, that's probably a few mm below the lower limit of where the stem can securely be.
The max height line on the seatpost shouldn't be visible.
When a multi-bolt handlebar clamp is adjusted, each fastening should be engaged almost evenly. This cannot be judged by subjective torque feels.
All fastenings on a stem should really be tightened to the appropriate torque, and this really depends on the size, composition, and thread treatment of the parts involved, including the internal threads, external threads, quill/conical wedge, steerer tube column, stem body, clamp, and handlebar. Subjectively, this also really depends on the tool and how it's used. An experienced bike wrench could probably show you how tight they should be for test riding.
STEP 2: record that shape.
So the rider finds something they like, but it's out of their price range? If they're test riding a new bike, all the nice info may be obtained.
Take note of the make and model of the bike frameset, and do some research. The only reason a bike at most 5 years old was stated was for the likely ease of getting the frameset comany's dimensions.
Measure the distance from the intersection of the center of the top tube and the center of the headtube, to where the center of the stem shaft which fits on the fork meets the plane of the middle of the stem extension shaft, and from that point to the center of the handlebar. One may fancy using a protractor with a piece of taught knotted string in the center to get the approximate degree the stem extension points from the intersecting stem shaft (like the yellow bow in the picture below).
Other things to record: the saddle model, width, position of tilt and where the rails are clamped, seatpost position, the handlebars for the widths, reach, drop, rotation, the model of brake levers, where they're mounted on the bars, the type of handlebar grips, the crank length, and the crank and bottom bracket q-angle.
Most of the following dimensions a nice frameset company will describe:

Key measurements to get are the EFFECTIVE SEAT TUBE LENGTH (pink in above pic), center of the bottom bracket shell to the end of the effective top tube, THE EFFECTIVE TOP TUBE LENGTH (upper red one), center of one tube to the center of the other (ps: the two red lines are parallel, not equal in length) THE EFFECTIVE SEAT TUBE ANGLE (blue bow), center of one tube to the center of the other, and the EFFECTIVE HEAD TUBE ANGLE (green bow), the effective top tube line to the center of the head tube plane. The lower red line runs from the center of one axle to the center of the other. If the wheels were two different sizes, almost all measurements would change, since these try to easily relate to the direction of gravity.
The seat tube angle matters, besides like what was noted as a variable in how much power can be transferred to the pedals and how one's upper body weight is balanced over the frame:

From Alex Wetmore:

"Imagine that the center of your saddle is where the 'height of saddle' arrow is pointing. The cyan bike with the 73.5 degree seat tube angle effectively has a 19mm longer top tube than the purple bike with the 72 degree seat tube angle."
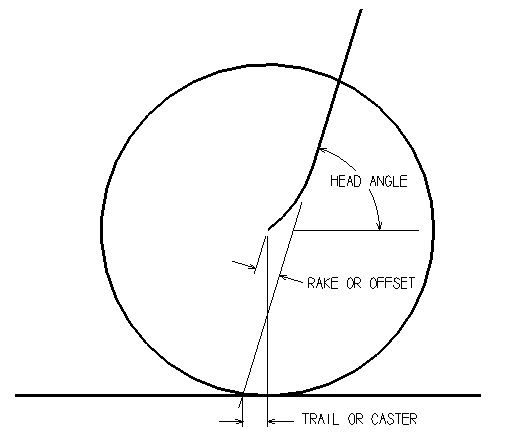
Head tube angles and fork rakes may have more to do with how prone the bike rides straight than the fit, especially when there is cargo on the front. On the topic of stability, it also may become an issue when the stem and handlebars go way out from the steering axis.
STEP 3: compare this info with that of a cheaper bike from maybe the same shop, the shops that sell used, or to sound nice, "vintage", "restored", or "refurbished" bikes1, classfields, the transfer stations (maybe with a message in writing stating the prosector won't sue them if a found bike there snaps in halfs under someone at 40mph), collectives2, second hand stores, unclaimed bikes at the police department (also checking to see if they're still hot3), abandoned bikes in dumpsters, old storage units, etc
Some big variables that would be controlled just for a more accurate comparison are a bike's mechanics and the perceived effort to make the bike do what's requested. The perceived effort, I've read from someone who got it from somewhere I don't know of, isn't an accurate gauge for objective biomechanical efficiency, but comfort is different. If the rider likes speed, and bike A with well built wheels and tires 23 mm wide with no tread at 100 psi, tight foot-pedal retention, brand new bearings, a gearing for desired cadences, and dimensions that fit this rider well, is test ridden on pavement, with a tailwind up a hill, before bike B is test ridden in the same enviornment, with identical fit geometry, but with a headwind up the same hill, poorly built wheels, tires 50mm wide with tread for soft turf at 40 psi, a very cycled, dirty bearing system adjusted too tight, a loose foot-pedal retention, and a gearing that doesn't allow the desired cadences at the right time, the rider may think bike B is too small or laid back from the frameset shape. So this ain't perfect.
The cheaper bike or frame for comparison needs, at the very least, attached wheels, a fork, and a dialed in headset, of the same dimensions (wheel diameter difference, if any, steerer tube threaded depth from top headset cup/race, which should be adjusted like the common procedure, lower headset bearing stack height, fork blade extension and rake) that the rider would intended to ultimately use. Prop the cheaper bike on level ground so it can stand somewhat vertical without falling over. Make sure these props don't take out some of the force that would be pressed on the ground by the wheels if the bike was unsupported and ready to fall over. The more vertical, the better. There's probably one level in every 5 garages in this country never used that one could slide from wheel to wheel. If the bubble stays in the lines during the whole trip, that's my thumbs up. Tape a piece of cord at the top tube-head tube intersection point, pull it taught to the seatpost with one hand, using the other hand to know where that taught string along the seatpost will be level, then put down the level, and mark the seatpost. Tie this other end of the cord to the seapost where the extending straight end of the hitch/knot will be right over the seapost mark. The cord should still be taut. This whole part may be off depending how vertical the bike stands. Take a goniometer (pic below) and measure the intersecting angle of the cord and seatpost. A tape measure may get the other essentials.

One may compare the two framesets by plotting the points on graph paper with a straight edge, a protractor, and colored pencils at the biggest scale the paper will allow. Then one may consider what stems, cranks, saddles, handlebars, and brake levers may be compatible, in the range of desired dimensions, and available on the market now, and just a few years into the future.
examples: Stems and handlebars can, possibly, fatigue over time, and it's more likely when designers and engineers try to make a weight-strength-durability compromise of these parts the rider's health insurance may be effected by if not periodically checked or considered with some creaking sounds. Getting a brand new quill stem that can reliably take a 25.4mm bar clamp (or a 26.0mm bar clamp with the right shim) that has the extension base 15cm from where the quill taper starts and an extension 13cm from the other shaft at 90˚ may be hard. If the seat tube angle on the cheaper bike is bigger than what one wants, one may find a comfy saddle with rails that can hook a seatpost clamp close enough to the nose of the saddle, but they may not. If the reach is too long, one may find a stem with an extension of 60cm and a drop handlebar reach less than 9cm from the flat part to the curl. There are stem extenders, adjustable stems, and quill stem to threadless stem adapters. There's one stem manufacturer (Salsa) that states there should be no more than 3mm of threadless stem clamping shaft not clamping the steerer tube/quill stem adapter to avoid catastrophic failure on some models or something, and some adapters don't allow this with threadless stems that work. The faceplate of most threadless stems do the clamping only along it's edge, and many old handlebars have a tapered stem clamp section that's not that wide. There are pedals with the mashing surface rotating more off center from the pedal axle than most on the market (but they can only be used on certain cranks).
Is all this effort worthwhile? For a certain rider, I don't know. One can also throw more money at it than time, from shops I've heard have way more combined experience trying to fit someone else, and I've heard from some off the bat to be very worth it; the shack's neighbors R & E, Gregg's, Montlake, Elliott Bay, Aaron's Bicycle Repair, Cycle University, Counterbalance, Perfect Wheels, there are more.
1. In Seattle, Recycled Cycles, sometimes JRA Crown Hill, Hello Bicycle, Bike So Good, 20/20 Cycle, most shops sometimes, plus many shops get bikes taken out from folks refusing a service quote and such
2. the shack, BikeWorks, The Bikery
3. http://stolenbicycleregistry.com/, http://www.nationalbikeregistry.com/ anyone can actually check a claim by calling them 1-800-848-3453 in case the local cops didn't get around to checking it yet, folks may also get the word out via classfields, tweets, blogs, calling shops, etc

It is nice post and I found some interesting information on this blog, keep it up. Thanks for sharing. . .
ReplyDeletemovers and packers ahmedabad.